Lateral Movement and Pivoting
https://tryhackme.com/room/lateralmovementandpivoting

🔗 Lateral Movement and Pivoting
Task 1 - Deploy machine

🎯 Target IP: 10.200.19.101
Download VPN
Go here to download correct network VPN (select networks and room name) server and not the classic VPN file for normal machines: https://tryhackme.com/access

Start VPN in a dedicated shell: sudo openvpn laterlmovementandpivoting.ovpn
Create a directory on the Desktop with the machine's name, and inside this directory, create another directory to store the materials and outputs needed to run the machine.
Kali
If you are using a Kali VM, Network Manager is most likely used as DNS manager. You can use GUI Menu to configure DNS:
Network Manager -> Advanced Network Configuration -> Your Connection -> IPv4 Settings
Set your DNS IP here to the IP for THMDC in the network diagram above
Add another DNS such as 1.1.1.1 or similar to ensure you still have internet access
Run
sudo systemctl restart NetworkManagerand test your DNS similar to the steps above.

Requesting Your Credentials
To simulate an AD breach, you will be provided with your first set of AD credentials. Once your networking setup has been completed, on your Attack Box, navigate to http://distributor.za.tryhackme.com/creds to request your credential pair. Click the "Get Credentials" button to receive your credential pair that can be used for initial access.


This credential pair (arthur.campbell::Pksp9395) will provide you SSH access to THMJMP2.za.tryhackme.com. THMJMP2 can be seen as a jump host into this environment, simulating a foothold that you have achieved.
For SSH access, you can use the following command:
ssh za\\<AD Username>@thmjmp2.za.tryhackme.com
or via RDP using rdesktop or xfreedrp:
A Note on Reverse Shells
If you are using the AttackBox and have joined other network rooms before, be sure to select the IP address assigned to the tunnel interface facing the lateralmovementandpivoting network as your ATTACKER_IP, or else your reverse shells/connections won't work properly. For your convenience, the interface attached to this network is called lateralmovement, so you should be able to get the right IP address by running ip add show lateralmovement:

This will be helpful whenever needing to do a reverse connection back to your attacker machine throughout the room.
Task 2 - Moving Through the Network
What is Lateral Movement?
Simply put, lateral movement is the group of techniques used by attackers to move around a network. Once an attacker has gained access to the first machine of a network, moving is essential for many reasons, including the following: - Reaching our goals as attackers - Bypassing network restrictions in place - Establishing additional points of entry to the network - Creating confusion and avoid detection.
While many cyber kill chains reference lateral movement as an additional step on a linear process, it is actually part of a cycle. During this cycle, we use any available credentials to perform lateral movement, giving us access to new machines where we elevate privileges and extract credentials if possible. With the newfound credentials, the cycle starts again.
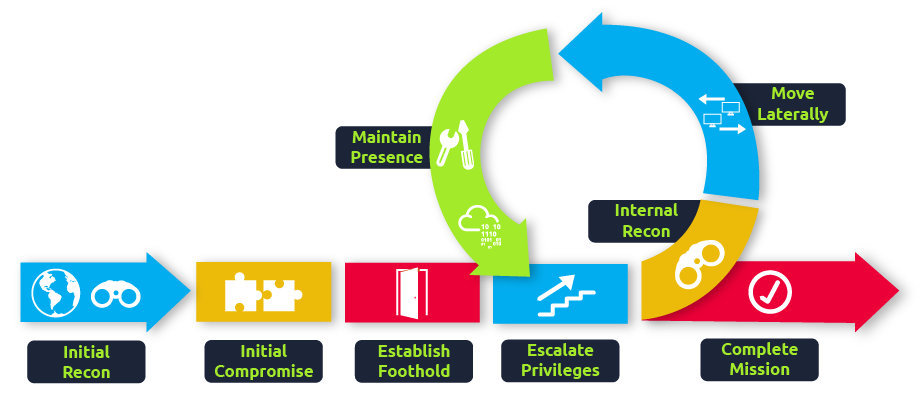
Usually, we will repeat this cycle several times before reaching our final goal on the network. If our first foothold is a machine with very little access to other network resources, we might need to move laterally to other hosts that have more privileges on the network.
A Quick Example
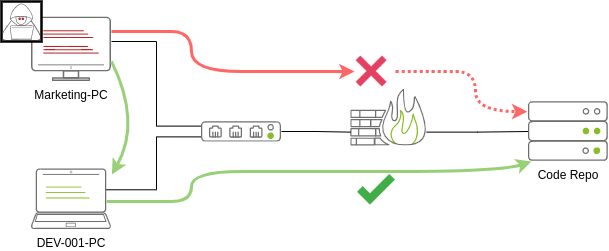
Suppose we are performing a red team engagement where our final goal is to reach an internal code repository, where we got our first compromise on the target network by using a phishing campaign. Usually, phishing campaigns are more effective against non-technical users, so our first access might be through a machine in the Marketing department.
Marketing workstations will typically be limited through firewall policies to access any critical services on the network, including administrative protocols, database ports, monitoring services or any other that aren't required for their day to day labour, including code repositories.
To reach sensitive hosts and services, we need to move to other hosts and pivot from there to our final goal. To this end, we could try elevating privileges on the Marketing workstation and extracting local users' password hashes. If we find a local administrator, the same account may be present on other hosts. After doing some recon, we find a workstation with the name DEV-001-PC. We use the local administrator's password hash to access DEV-001-PC and confirm it is owned by one of the developers in the company. From there, access to our target code repository is available.
Notice that while lateral movement might need to be used to circumvent firewall restrictions, it is also helpful in evading detection. In our example, even if the Marketing workstation had direct access to the code repository, it is probably desirable to connect through the developer's PC. This behaviour would be less suspicious from the standpoint of a blue team analyst checking login audit logs.
The Attacker's Perspective
There are several ways in which an attacker can move laterally. The simplest way would be to use standard administrative protocols like WinRM, RDP, VNC or SSH to connect to other machines around the network. This approach can be used to emulate regular users' behaviours somewhat as long as some coherence is maintained when planning where to connect with what account. While a user from IT connecting to the web server via RDP might be usual and go under the radar, care must be taken not to attempt suspicious connections (e.g. why is the local admin user connecting to the DEV-001-PC from the Marketing-PC?).
Attackers nowadays also have other methods of moving laterally while making it somewhat more challenging for the blue team to detect what is happening effectively. While no technique should be considered infallible, we can at least attempt to be as silent as possible. In the following tasks, we will look at some of the most common lateral movement techniques available.
Administrators and UAC
While performing most of the lateral movement techniques introduced throughout the room, we will mainly use administrator credentials. While one might expect that every single administrator account would serve the same purpose, a distinction has to be made between two types of administrators:
Local accounts part of the local Administrators group
Domain accounts part of the local Administrators group
The differences we are interested in are restrictions imposed by User Account Control (UAC) over local administrators (except for the default Administrator account). By default, local administrators won't be able to remotely connect to a machine and perform administrative tasks unless using an interactive session through RDP. Windows will deny any administrative task requested via RPC, SMB or WinRM since such administrators will be logged in with a filtered medium integrity token, preventing the account from doing privileged actions. The only local account that will get full privileges is the default Administrator account.
Domain accounts with local administration privileges won't be subject to the same treatment and will be logged in with full administrative privileges.
This security feature can be disabled if desired, and sometimes you will find no difference between local and domain accounts in the administrator's group. Still, it's essential to keep in mind that should some of the lateral movement techniques fail, it might be due to using a non-default local administrator where UAC is enforced. You can read more details about this security feature here.
Task 3 - Spawning Processes Remotely
This task will look at the available methods an attacker has to spawn a process remotely, allowing them to run commands on machines where they have valid credentials. Each of the techniques discussed uses slightly different ways to achieve the same purpose, and some of them might be a better fit for some specific scenarios.
Psexec
Ports: 445/TCP (SMB)
Required Group Memberships: Administrators
Psexec has been the go-to method when needing to execute processes remotely for years. It allows an administrator user to run commands remotely on any PC where he has access. Psexec is one of many Sysinternals Tools and can be downloaded here.
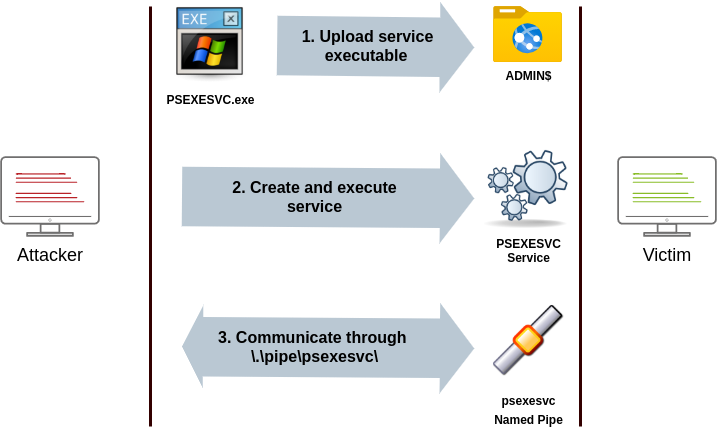
The way psexec works is as follows:
Connect to Admin$ share and upload a service binary. Psexec uses psexesvc.exe as the name.
Connect to the service control manager to create and run a service named PSEXESVC and associate the service binary with
C:\Windows\psexesvc.exe.Create some named pipes to handle stdin/stdout/stderr.
To run psexec, we only need to supply the required administrator credentials for the remote host and the command we want to run (psexec64.exe is available under C:\tools in THMJMP2 for your convenience):
Remote Process Creation Using WinRM
Ports: 5985/TCP (WinRM HTTP) or 5986/TCP (WinRM HTTPS)
Required Group Memberships: Remote Management Users
Windows Remote Management (WinRM) is a web-based protocol used to send Powershell commands to Windows hosts remotely. Most Windows Server installations will have WinRM enabled by default, making it an attractive attack vector.
To connect to a remote Powershell session from the command line, we can use the following command:
We can achieve the same from Powershell, but to pass different credentials, we will need to create a PSCredential object:
Once we have our PSCredential object, we can create an interactive session using the Enter-PSSession cmdlet:
Powershell also includes the Invoke-Command cmdlet, which runs ScriptBlocks remotely via WinRM. Credentials must be passed through a PSCredential object as well:
Remotely Creating Services Using sc
Ports:
135/TCP, 49152-65535/TCP (DCE/RPC)
445/TCP (RPC over SMB Named Pipes)
139/TCP (RPC over SMB Named Pipes)
Required Group Memberships: Administrators
Windows services can also be leveraged to run arbitrary commands since they execute a command when started. While a service executable is technically different from a regular application, if we configure a Windows service to run any application, it will still execute it and fail afterwards.
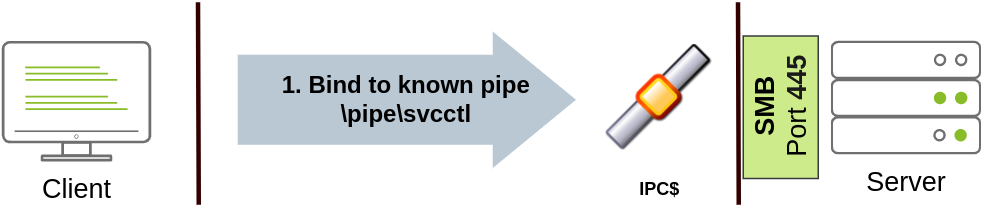
We can create a service on a remote host with sc.exe, a standard tool available in Windows. When using sc, it will try to connect to the Service Control Manager (SVCCTL) remote service program through RPC in several ways:
A connection attempt will be made using DCE/RPC. The client will first connect to the Endpoint Mapper (EPM) at port 135, which serves as a catalogue of available RPC endpoints and request information on the SVCCTL service program. The EPM will then respond with the IP and port to connect to SVCCTL, which is usually a dynamic port in the range of 49152-65535.
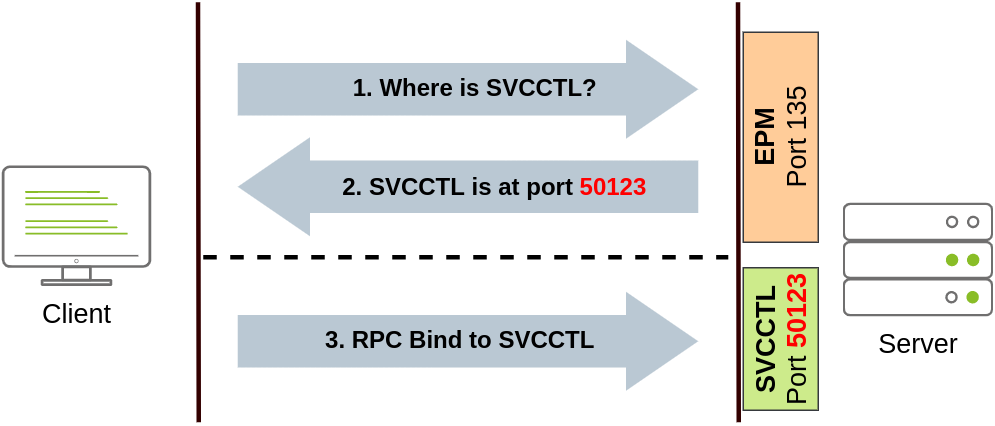
If the latter connection fails, sc will try to reach SVCCTL through SMB named pipes, either on port 445 (SMB) or 139 (SMB over NetBIOS).
We can create and start a service named "THMservice" using the following commands:
The "net user" command will be executed when the service is started, creating a new local user on the system. Since the operating system is in charge of starting the service, you won't be able to look at the command output.
To stop and delete the service, we can then execute the following commands:
Creating Scheduled Tasks Remotely
Another Windows feature we can use is Scheduled Tasks. You can create and run one remotely with schtasks, available in any Windows installation. To create a task named THMtask1, we can use the following commands:
We set the schedule type (/sc) to ONCE, which means the task is intended to be run only once at the specified time and date. Since we will be running the task manually, the starting date (/sd) and starting time (/st) won't matter much anyway.
Since the system will run the scheduled task, the command's output won't be available to us, making this a blind attack.
Finally, to delete the scheduled task, we can use the following command and clean up after ourselves:
Let's Get to Work!
To complete this exercise, you will need to connect to THMJMP2 using the credentials assigned to you in Task 1 from http://distributor.za.tryhackme.com/creds. If you haven't done so yet, click on the link and get credentials now. Once you have your credentials, connect to THMJMP2 via SSH:
ssh za\\<AD Username>@thmjmp2.za.tryhackme.com
For this exercise, we will assume we have already captured some credentials with administrative access:
User: ZA.TRYHACKME.COM\t1_leonard.summers
Password: EZpass4ever
We'll show how to use those credentials to move laterally to THMIIS using sc.exe. Feel free to try the other methods, as they all should work against THMIIS.
While we have already shown how to use sc to create a user on a remote system (by using net user), we can also upload any binary we'd like to execute and associate it with the created service. However, if we try to run a reverse shell using this method, we will notice that the reverse shell disconnects immediately after execution. The reason for this is that service executables are different to standard .exe files, and therefore non-service executables will end up being killed by the service manager almost immediately. Luckily for us, msfvenom supports the exe-service format, which will encapsulate any payload we like inside a fully functional service executable, preventing it from getting killed.
To create a reverse shell, we can use the following command:
We will then proceed to use t1_leonard.summers credentials to upload our payload to the ADMIN$ share of THMIIS using smbclient from our attacker machine:
Now, create a multi handler reverse shell using msfconsole:
and go in listening mode in another shell via netcat on a different port:

We can access to machine via RDP using the following command:
and run as netcat a cmd.exe, starting the connection on netcat listner:

after that we need to execute sc.exe

3.1 - After running the "flag.exe" file on t1_leonard.summers desktop on THMIIS, what is the flag?
and retrieve the flag value executing Flag.exe file:

Task 4 -
4.1 -
Task 5 -
5.2 -
5.3 -
Last updated