Enumerating Active Directory
https://tryhackme.com/room/adenumeration
🔗 Enumerating Active Directory
Task 1 - Intro & Deploy machine
Attacker Machine: 10.50.6.7

Create a directory on the Desktop with the machine's name, and inside this directory, create another directory to store the materials and outputs needed to run the machine.
Connect to OpenVPN adenumeration network:

Kali
If you are using a Kali VM, Network Manager is most likely used as DNS manager. You can use GUI Menu to configure DNS:
Network Manager -> Advanced Network Configuration -> Your Connection -> IPv4 Settings
Set your DNS IP here to the IP for THMDC in the network diagram above
Add another DNS such as 1.1.1.1 or similar to ensure you still have internet access
Run
sudo systemctl restart NetworkManagerand test your DNS similar to the steps above.
or modify /etc/resolv.conf file using an editor like as nano

Requesting Your Credentials
To simulate an AD breach, you will be provided with your first set of AD credentials. Once your networking setup has been completed, on your Attack Box, navigate to http://distributor.za.tryhackme.com/creds to request your credential pair. Click the "Get Credentials" button to receive your credential pair that can be used for initial access.

This credential pair (Username: phillip.reid Password: Scooter1987) will provide you RDP and SSH access to THMJMP1.za.tryhackme.com. THMJMP1 can be seen as a jump host into this environment, simulating a foothold that you have achieved. Jump hosts are often targeted by the red team since they provide access to a new network segment. You can use Remmina or any other similar Remote Desktop client to connect to this host for RDP. Remember to specify the domain of za.tryhackme.com when connecting. Task 2 and 3 will require RDP access.
For SSH access, you can use the following SSH command:
ssh za.tryhackme.com\\<AD Username>@thmjmp1.za.tryhackme.com
When prompted, provide your account's associated password. Although RDP can be used for all tasks, SSH is faster and can be used for Task 4, 5, and 6.
Task 2 - Credential Injection
Runas Explained
Have you ever found AD credentials but nowhere to log in with them? Runas may be the answer you've been looking for!
In security assessments, you will often have network access and have just discovered AD credentials but have no means or privileges to create a new domain-joined machine. So we need the ability to use those credentials on a Windows machine we control.
If we have the AD credentials in the format of <username>:<password>, we can use Runas, a legitimate Windows binary, to inject the credentials into memory. The usual Runas command would look something like this:
Let's look at the parameters:
/netonly - Since we are not domain-joined, we want to load the credentials for network authentication but not authenticate against a domain controller. So commands executed locally on the computer will run in the context of your standard Windows account, but any network connections will occur using the account specified here.
/user - Here, we provide the details of the domain and the username. It is always a safe bet to use the Fully Qualified Domain Name (FQDN) instead of just the NetBIOS name of the domain since this will help with resolution.
cmd.exe - This is the program we want to execute once the credentials are injected. This can be changed to anything, but the safest bet is cmd.exe since you can then use that to launch whatever you want, with the credentials injected.
Once you run this command, you will be prompted to supply a password. Note that since we added the /netonly parameter, the credentials will not be verified directly by a domain controller so that it will accept any password. We still need to confirm that the network credentials are loaded successfully and correctly.
Note: If you use your own Windows machine, you should make sure that you run your first Command Prompt as Administrator. This will inject an Administrator token into CMD. If you run tools that require local Administrative privileges from your Runas spawned CMD, the token will already be available. This does not give you administrative privileges on the network, but will ensure that any local commands you execute, will execute with administrative privileges.
We can access to machine via RDP using the following command:
2.1 - What native Windows binary allows us to inject credentials legitimately into memory?
runas.exe
2.2 - What parameter option of the runas binary will ensure that the injected credentials are used for all network connections?
/netonly
2.3 -What network folder on a domain controller is accessible by any authenticated AD account and stores GPO information?
SYSVOL
2.4 - When performing dir \\za.tryhackme.com\SYSVOL, what type of authentication is performed by default?
Kerberos Authentication
Task 3 - Enumeration through Microsoft Management Console
Connect to THMJMP1 using RDP and your provisioned credentials from Task 1 to perform this task.
Microsoft Management Console
In this task, we will explore our first enumeration method, which is the only method that makes use of a GUI until the very last task. We will be using the Microsoft Management Console (MMC) with the Remote Server Administration Tools' (RSAT) AD Snap-Ins. If you use the provided Windows VM (THMJMP1), it has already been installed for you. However, if you are using your own Windows machine, you can perform the following steps to install the Snap-Ins:
Press Start
Search "Apps & Features" and press enter
Click Manage Optional Features
Click Add a feature
Search for "RSAT"
Select "RSAT: Active Directory Domain Services and Lightweight Directory Tools" and click Install
You can start MMC by using the Windows Start button, searching run, and typing in MMC. If we just run MMC normally, it would not work as our computer is not domain-joined, and our local account cannot be used to authenticate to the domain.

This is where the Runas window from the previous task comes into play. In that window, we can start MMC, which will ensure that all MMC network connections will use our injected AD credentials.
In MMC, we can now attach the AD RSAT Snap-In:
Click File -> Add/Remove Snap-in
Select and Add all three Active Directory Snap-ins
Click through any errors and warnings
Right-click on Active Directory Domains and Trusts and select Change Forest
Enter za.tryhackme.com as the Root domain and Click OK
Right-click on Active Directory Sites and Services and select Change Forest
Enter za.tryhackme.com as the Root domain and Click OK
Right-click on Active Directory Users and Computers and select Change Domain
Enter za.tryhackme.com as the Domain and Click OK
Right-click on Active Directory Users and Computers in the left-hand pane
Click on View -> Advanced Features
Users and Computers
Let's take a look at the Active Directory structure. For this task, we will focus on AD Users and Computers. Expand that snap-in and expand the za domain to see the initial Organisational Unit (OU) structure:

Here we see that the users are divided according to department OUs. Clicking on each of these OUs will show the users that belong to that department. Clicking on any of these users will allow us to review all of their properties and attributes. We can also see what groups they are a member of.
If we had the relevant permissions, we could also use MMC to directly make changes to AD, such as changing the user's password or adding an account to a specific group. Play around with MMC to better understand the AD domain structure. Make use of the search feature to look for objects.
3.1 - How many Computer objects are part of the Servers OU?
2
3.2 - How many Computer objects are part of the Workstations OU?
1
3.3 - How many departments (Organisational Units) does this organisation consist of?
7
3.4 - How many Admin tiers does this organisation have?
3
3.5 - What is the value of the flag stored in the description attribute of the t0_tinus.green account?

Task 4 - Enumeration through Command Prompt
Users
We can use the net command to list all users in the AD domain by using the user sub-option:

This will return all AD users for us and can be helpful in determining the size of the domain to stage further attacks. We can also use this sub-option to enumerate more detailed information about a single user account:

Groups
We can use the net command to enumerate the groups of the domain by using the group sub-option:

This information can help us find specific groups to target for goal execution. We could also enumerate more details such as membership to a group by specifying the group in the same command:
Password Policy
We can use the net command to enumerate the password policy of the domain by using the accounts sub-option:

4.1 - Apart from the Domain Users group, what other group is the aaron.harris account a member of?

Internet Access
4.2 - Is the Guest account active? (Yay,Nay)

Nay
4.3 - How many accounts are a member of the Tier 1 Admins group?

7
4.4 - What is the account lockout duration of the current password policy in minutes?

30
The net commands must be executed from a domain-joined machine. If the machine is not domain-joined, it will default to the WORKGROUP domain.
The net commands may not show all information. For example, if a user is a member of more than ten groups, not all of these groups will be shown in the output.
Task 5 - Enumeration through PowerShell
PowerShell is the upgrade of Command Prompt. Microsoft first released it in 2006. While PowerShell has all the standard functionality Command Prompt provides, it also provides access to cmdlets (pronounced command-lets), which are .NET classes to perform specific functions. While we can write our own cmdlets, like the creators of PowerView did, we can already get very far using the built-in ones.
Users
We can use the Get-ADUser cmdlet to enumerate AD users:
The parameters are used for the following:
-Identity - The account name that we are enumerating
-Properties - Which properties associated with the account will be shown, * will show all properties
-Server - Since we are not domain-joined, we have to use this parameter to point it to our domain controller
For most of these cmdlets, we can also use the -Filter parameter that allows more control over enumeration and use the Format-Table cmdlet to display the results such as the following neatly:

Groups
We can use the Get-ADGroup cmdlet to enumerate AD groups:

We can also enumerate group membership using the Get-ADGroupMember cmdlet:
AD Objects
A more generic search for any AD objects can be performed using the Get-ADObject cmdlet. For example, if we are looking for all AD objects that were changed after a specific date:


If we wanted to, for example, perform a password spraying attack without locking out accounts, we can use this to enumerate accounts that have a badPwdCount that is greater than 0, to avoid these accounts in our attack:

Domains
We can use Get-ADDomain to retrieve additional information about the specific domain:

5.1 - What is the value of the Title attribute of Beth Nolan (beth.nolan)?

senior
5.2 - What is the value of the DistinguishedName attribute of Annette Manning (annette.manning)?

CN=annette.manning,OU=Marketing,OU=People,DC=za,DC=tryhackme,DC=com
5.3 - When was the Tier 2 Admins group created?

2/24/2022 10:04:41 pm
5.4 - What is the value of the SID attribute of the Enterprise Admins group?
S-1-5-21-3330634377-1326264276-632209373-519
5.5 - Which container is used to store deleted AD objects?

CN=Deleted Objects,DC=za,DC=tryhackme,DC=com
Task 6 - Enumeration through Bloodhound
Bloodhound History
For a significant amount of time, red teamers (and, unfortunately, attackers) had the upper hand. So much so that Microsoft integrated their own version of Bloodhound in its Advanced Threat Protection solution.
Bloodhound allowed attackers (and by now defenders too) to visualise the AD environment in a graph format with interconnected nodes. Each connection is a possible path that could be exploited to reach a goal. In contrast, the defenders used lists, like a list of Domain Admins or a list of all the hosts in the environment.
This graph-based thinking opened up a world to attackers. It allowed for a two-stage attack. In the first stage, the attackers would perform phishing attacks to get an initial entry to enumerate AD information. This initial payload was usually incredibly noisy and would be detected and contained by the blue team before the attackers could perform any actions apart from exfiltrating the enumerated data. However, the attackers could now use this data offline to create an attack path in graph format, showing precisely the steps and hops required. Using this information during the second phishing campaign, the attackers could often reach their goal in minutes once a breach was achieved. It is often even faster than it would take the blue team to receive their first alert. This is the power of thinking in graphs, which is why so many blue teams have also started to use these types of tools to understand their security posture better.
Sharphound
You will often hear users refer to Sharphound and Bloodhound interchangeably. However, they are not the same. Sharphound is the enumeration tool of Bloodhound. It is used to enumerate the AD information that can then be visually displayed in Bloodhound. Bloodhound is the actual GUI used to display the AD attack graphs. Therefore, we first need to learn how to use Sharphound to enumerate AD before we can look at the results visually using Bloodhound.
We can collect info using this command:
We can now use Bloodhound to ingest this ZIP to show us attack paths visually.
Bloodhound
As mentioned before, Bloodhound is the GUI that allows us to import data captured by Sharphound and visualise it into attack paths. Bloodhound uses Neo4j as its backend database and graphing system. Neo4j is a graph database management system. If you're using the AttackBox, you may use the red Bloodhound icon in the Dock to launch it. In all other cases, make sure Bloodhound and neo4j are installed and configured on your attacking machine. Either way, it is good to understand what happens in the background. Before we can start Bloodhound, we need to load Neo4j:

The default credentials for the neo4j database will be neo4j:neo4j. Use this to authenticate in Bloodhound. To import our results, you will need to recover the ZIP file from the Windows host. The simplest way is to use SCP command on your AttackBox:
scp <AD Username>@THMJMP1.za.tryhackme.com:C:/Users/<AD Username>/Documents/<Sharphound ZIP> .
Once you provide your password, this will copy the results to your current working directory. Drag and drop the ZIP file onto the Bloodhound GUI to import into Bloodhound. It will show that it is extracting the files and initiating the import.
Attack Paths
There are several attack paths that Bloodhound can show. Pressing the three stripes next to "Search for a node" will show the options. The very first tab shows us the information regarding our current imports.
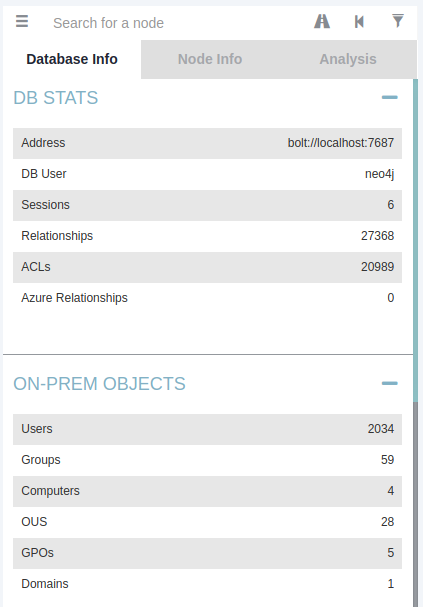
Note that if you import a new run of Sharphound, it would cumulatively increase these counts. First, we will look at Node Info. Let's search for our AD account in Bloodhound. You must click on the node to refresh the view. Also note you can change the label scheme by pressing LeftCtrl.
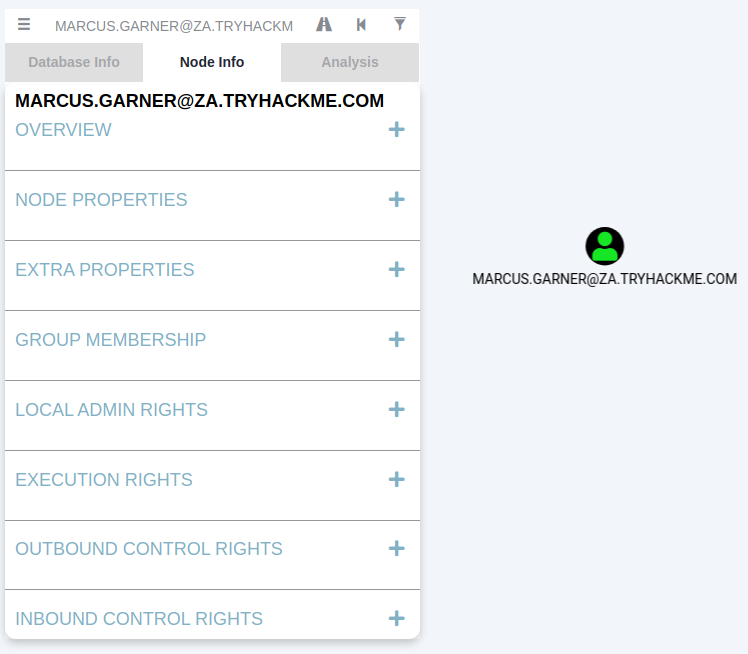
We can see that there is a significant amount of information returned regarding our use. Each of the categories provides the following information:
Overview - Provides summaries information such as the number of active sessions the account has and if it can reach high-value targets.
Node Properties - Shows information regarding the AD account, such as the display name and the title.
Extra Properties - Provides more detailed AD information such as the distinguished name and when the account was created.
Group Membership - Shows information regarding the groups that the account is a member of.
Local Admin Rights - Provides information on domain-joined hosts where the account has administrative privileges.
Execution Rights - Provides information on special privileges such as the ability to RDP into a machine.
Outbound Control Rights - Shows information regarding AD objects where this account has permissions to modify their attributes.
Inbound Control Rights - Provides information regarding AD objects that can modify the attributes of this account.
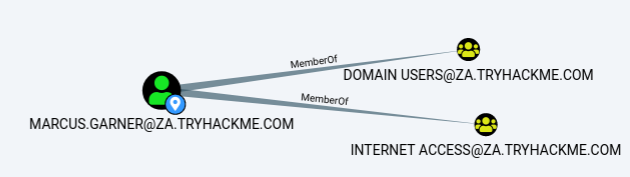
If you want more information in each of these categories, you can press the number next to the information query. For instance, let's look at the group membership associated with our account. By pressing the number next to "First Degree Group Membership", we can see that our account is a member of two groups.
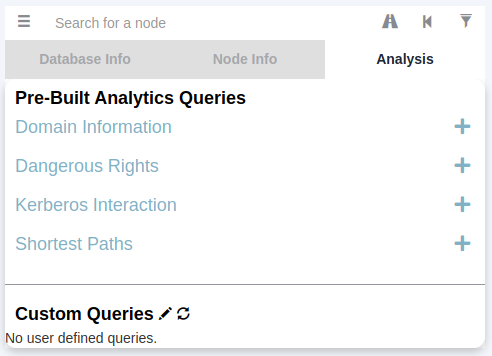
Next, we will be looking at the Analysis queries. These are queries that the creators of Bloodhound have written themselves to enumerate helpful information.
Under the Domain Information section, we can run the Find all Domain Admins query. Note that you can press LeftCtrl to change the label display settings.
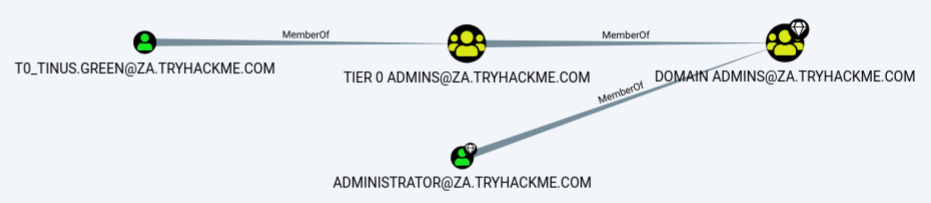
The icons are called nodes, and the lines are called edges. Let's take a deeper dive into what Bloodhound is showing us. There is an AD user account with the username of T0_TINUS.GREEN, that is a member of the group Tier 0 ADMINS. But, this group is a nested group into the DOMAIN ADMINS group, meaning all users that are part of the Tier 0 ADMINS group are effectively DAs.
Furthermore, there is an additional AD account with the username of ADMINISTRATOR that is part of the DOMAIN ADMINS group. Hence, there are two accounts in our attack surface that we can probably attempt to compromise if we want to gain DA rights. Since the ADMINISTRATOR account is a built-in account, we would likely focus on the user account instead.
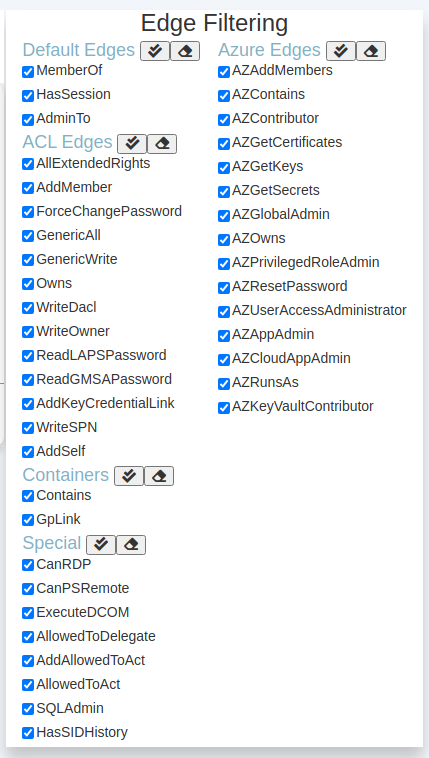
Each AD object that was discussed in the previous tasks can be a node in Bloodhound, and each will have a different icon depicting the type of object it is. If we want to formulate an attack path, we need to look at the available edges between the current position and privileges we have and where we want to go. Bloodhound has various available edges that can be accessed by the filter icon:
These are also constantly being updated as new attack vectors are discovered. We will be looking at exploiting these different edges in a future network. However, let's look at the most basic attack path using only the default and some special edges. We will run a search in Bloodhound to enumerate the attack path. Press the path icon to allow for path searching.

Our Start Node would be our AD username, and our End Node will be the Tier 1 ADMINS group since this group has administrative privileges over servers.
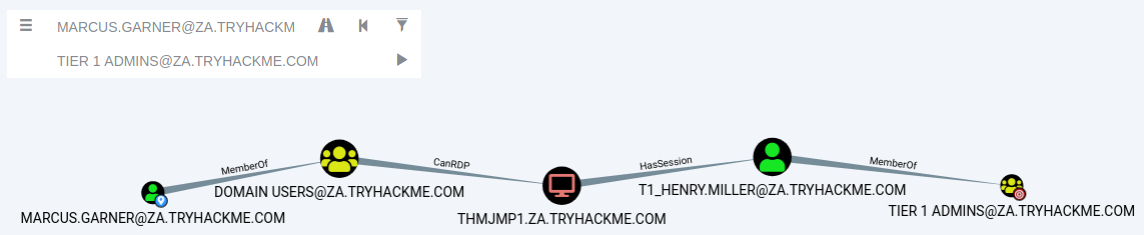
If there is no available attack path using the selected edge filters, Bloodhound will display "No Results Found". Note, this may also be due to a Bloodhound/Sharphound mismatch, meaning the results were not properly ingested. Please make use of Bloodhound v4.1.0. However, in our case, Bloodhound shows an attack path. It shows that one of the T1 ADMINS, ACCOUNT, broke the tiering model by using their credentials to authenticate to THMJMP1, which is a workstation. It also shows that any user that is part of the DOMAIN USERS group, including our AD account, has the ability to RDP into this host.
We could do something like the following to exploit this path:
Use our AD credentials to RDP into THMJMP1.
Look for a privilege escalation vector on the host that would provide us with Administrative access.
Using Administrative access, we can use credential harvesting techniques and tools such as Mimikatz.
Since the T1 Admin has an active session on THMJMP1, our credential harvesting would provide us with the NTLM hash of the associated account.
6.1 - What command can be used to execute Sharphound.exe and request that it recovers Session information only from the za.tryhackme.com domain without touching domain controllers?
Sharphound.exe --CollectionMethods Session --Domain za.tryhackme.com --ExcludeDCs
6.2 - Apart from the krbtgt account, how many other accounts are potentially kerberoastable?
4
6.3 - How many machines do members of the Tier 1 Admins group have administrative access to?
2
6.4 - How many users are members of the Tier 2 Admins group?
15
Task 7 - Conclusion
Enumerating AD is a massive task. Proper AD enumeration is required to better understand the structure of the domain and determine attack paths that can be leveraged to perform privilege escalation or lateral movement.
Mitigations
AD enumeration is incredibly hard to defend against. Many of these techniques mimic regular network traffic and behaviour, making it difficult to distinguish malicious traffic from normal traffic. However, there are a couple of things that we can do to detect potentially malicious behaviour:
Powerful AD enumeration techniques such as Sharphound generate a significant amount of LogOn events when enumerating session information. Since it executes from a single AD account, these LogOn events will be associated with this single account. We can write detection rules to detect this type of behaviour if it occurs from a user account.
We can write signature detection rules for the tools that must be installed for specific AD enumeration techniques, such as the SharpHound binaries and the AD-RSAT tooling.
Unless used by employees of our organisation, we can monitor the use of Command Prompt and Powershell in our organisation to detect potential enumeration attempts from unauthorised sources.

Last updated